Implementing continuous integration (CI) for an SFDX project can feel daunting the first time you try it. In this post, I’ll show you how to set up a simple CI pipeline—from authenticating your Dev Hub to running tests in a scratch org—so you can automate your Salesforce development workflow.
Implementing continuous integration (CI) for an SFDX project can feel daunting the first time you try it. In this post, I’ll show you how to set up a simple CI pipeline—from authenticating your Dev Hub to running tests in a scratch org—so you can automate your Salesforce development workflow.
Here is the companion video.
You can checkout the associated SFDX demo project here: rarekarma/demo-sfdxci.
Set up an SFDX Project
Starting with an empty SFDX project, we add a minimal set of functionality that triggers to an event log whenever a new Order is inserted. This is a toy example we will use to demonstrate how to set up continuous integration. There are three components:
- EventLog
- Logs newly inserted Orders.
- OrderTrigger
- Creates an EventLog each time a new Order is inserted into Salesforce.
- OrderTriggerTest
- A unit test designed to verify that an event gets logged when a new Order is inserted.
Create a Connected App for JWT Authentication
Our CI process needs to authenticate to our Dev Hub, so that it can create scratch orgs for automated deployment and testing of our code. Because authentication must happen without human interaction, we use Salesforce’s JWT Flow. Implementing JWT requires a Connected App for auth.
In Summer ’25, Salesforce made Connected Apps disabled by default on all new orgs and recommended using External Client Apps. However, after a great deal of frustrating trial-and-error, I discovered that (at the time of this writing), JWT authentication via an External Client App does not support creating scratch orgs.
Salesforce provides this guidance:
We don’t recommend that you create an External Client App, which is the next generation of Salesforce connected apps, particularly when authorizing a Dev Hub org. The main reason is that using the Dev Hub org to create scratch orgs can lead to errors.
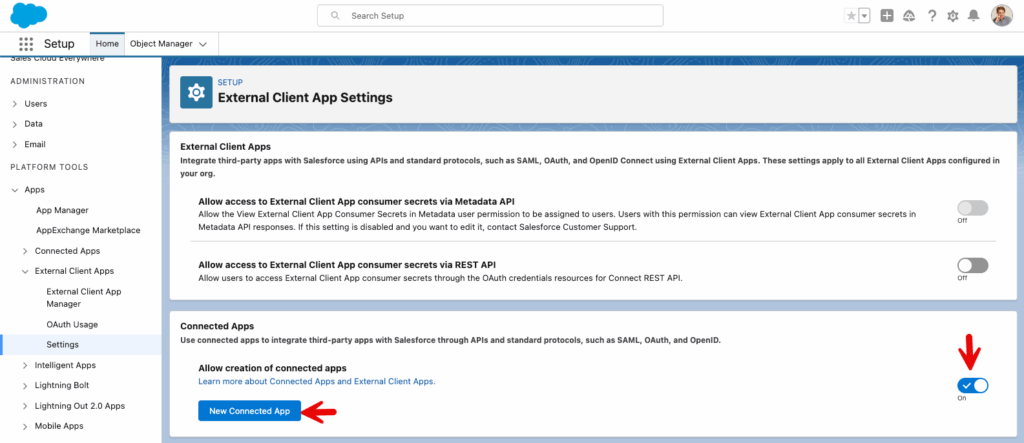
To get around this issue, you need access the deprecated Connected App functionality from Settings > Apps > External Client Apps > Settings. From here, you can turn on “Allow creation of connected apps”, and use the “New Connected App” button to create a legacy connected app for JWT.

You can follow these instructions to create the Connected App for JWT. The configuration can be finicky. Here are the settings that worked for me.
OAuth Policies
- Permitted Users: Admin approved users are pre-authorized
- IP Relaxation: Relax IP restrictions
- Refresh Token Policy: Refresh token is valid until revoked
Profiles
- System Administrator (in a non-demo setting, you should create a profile or permission set specifically for the user who will authentiate)
API
- Enable OAuth Settings
- Callback URL: http://localhost:1717/OauthRedirect
- Use digital signatures (see these instructions to generate and upload a certificate)
- Selected OAuth Scopes
- Manage user data via APIs (api)
- Manage user data via Web browsers (web)
- Perform requests at any time (refresh_token, offline_access)
- DESELECT: PKCE, Secret for Web Flow, Secret for Refresh Token Flow
Once your Connected App is set up, test out authentication with these CLI commands. First, decode the private key so it can be passed to the authentication command. Then, authenticate using the JWT flow. Lastly, create a scratch org.
echo "$SFDXCI_JWT_KEY_BASE64" | base64 --decode > /tmp/server.key
					sf auth jwt grant \
  --client-id "$SFDXCI_CLIENTID" \
  --jwt-key-file /tmp/server.key \
  --username "$SFDXCI_USER" \
  --instance-url https://login.salesforce.com \
  --set-default-dev-hub
					sf org create scratch \
  --definition-file config/project-scratch-def.json \
  --duration-days 1 \
  --alias ci-scratch
Key parameters should be stored in environment variables, as this is how we will set up the CI flow. Be careful not to check this into GitHub – particularly the private key. This information will be stored as GitHub Secrets.
					SFDXCI_CLIENTID=<the client id of the connected app>
SFDXCI_USER=<the username that will be authenticating>
SFDXCI_JWT_KEY_BASE64=<base 64 encoding of your private key>
When you’ve confirmed that everything runs smoothly locally, the next step is to set up your GitHub Actions workflow to handle the same process automatically in CI.
GitHub Actions
The next step is to define a workflow file in your repository. The following example demonstrates how to configure GitHub Actions to install the Salesforce CLI, authenticate your Dev Hub, and run your SFDX commands automatically whenever you push changes.
The snippet below shows how the workflow handles authorization, creates a scratch org, deploys components, and runs tests. Note that for this to run, you need to add the secrets to GitHub. You can check out the full workflow file here: ci-deploy-tests.yml.
					  - name: Auth to Dev Hub
    env:
      SFDXCI_CLIENTID: ${{ secrets.SFDXCI_CLIENTID }}
      SFDXCI_USER: ${{ secrets.SFDXCI_USER }}
    run: |
      sf auth jwt grant \
        --client-id "$SFDXCI_CLIENTID" \
        --jwt-key-file /tmp/server.key \
        --username "$SFDXCI_USER" \
        --instance-url https://login.salesforce.com \
        --set-default-dev-hub

  - name: Create scratch org
    id: create_scratch
    run: |
      sf org create scratch \
        --definition-file config/project-scratch-def.json \
        --duration-days 1 \
        --alias ci-scratch

  - name: Deploy components
    env:
      ORG: ci-scratch
    run: |
      sf project deploy start \
        --target-org ci-scratch \
        --wait 10

  - name: Run Apex tests
    run: |
      sf apex test run --target-org ci-scratch \
        --wait 10 \
        --json > /tmp/apex-tests.json
Wrapping Up
Although this example project is just a toy, it captures the essentials of setting up continuous integration for a Salesforce SFDX workflow — verifying your commands locally, then automating them in GitHub Actions. Once you’ve got this foundation in place, the next step is to make it real for team development — triggering builds automatically on pull requests, validating changes before they merge, and keeping your main branch deployable at all times.
Feel free to check out the YouTube video.